
Updated September 2023.
A business email address using your own domain name is a necessity in today's technological age, as a way to show your customers that you are both professional and trustworthy.
We've developed this guide to help businesses in Hobart and Tasmania; detailing how to use Crazy Domains and Google's Workspace (formerly G Suite) to create your own business email address.
Current promotion codes (Business Starter plan for Asia Pacific Region):
Creating a business email means that you use your domain name as a part of the address, instead of the generic @gmail.com or @outlook.com.
Free email addresses are great for getting started, however they lack the professional image that a business email brings. A generic email can also be created by just about anyone these days, making it hard for your potential customers or clients to trust where an email has actually come from.
Benefits of having a business email using your domain name include:
We will walk you through creating each of these, however to get started you'll need:
Why Crazy Domains and Google Workspace?
There are a plethora of email options out there, each with their pros and cons. We don't specifically advocate for one over the other, apart from that Crazy Domains and Google Workspace combination is what we use and have never had any problems with it.
Purchasing and setting up email accounts directly through a domain name provider is okay, however we've personally found that email clients like Outlook or Airmail often don't like the servers they use and remembering how to access them via a webmail client can be annoying.
Google Workspace and Gmail are one of (if not the) biggest and most secure email platforms in the world, and there's also the added benefit of being able to easily access your emails via the Gmail website if you're travelling abroad or don't have a regular device with you.
The two costs are:
You can purchase a domain name from Crazy Domains for around $20.99 AUD for a 1-year purchase. A Google Workspace Suite Basic Account starts at $8.40 per month (~$100 per year). This means you can setup a functioning business email from around $120 per year.
It's important to note that there are a few variables to the cost also which include how long you purchase your domain name for, what type of domain name you purchase and how many emails you want to setup.
Google Workspace also offers a free trial which is great if you want to try out Google Workspace before you purchase an account.
As a Google Workspace user, we're also a part of their referral program - so you can also head to Google Workspace using this affiliate link.
All the same if you're ready to get started, let's jump in...
The first step is to purchase your domain name. If you already own your domain name and are looking to just setup a business email, you can skip to step 2.
To begin, click here to head over to Crazy Domains (affiliate link).
Use the large search bar to search for an available domain name. Choosing a good, relevant domain name is important - however don't spend too long trying to figure this out.

Choose the appropriate 'end' for your domain (i.e. .com.au) or an alternative, then you can click the drop down to select how long you want to purchase your domain for.
Helpful tip: Wondering whether you should choose '.com' or '.com.au?'' I often advocate for '.com.au' as it lets customers know you're a trustworthy Australian business, however if your scope is international or you don't have an ABN, then you can opt for another option.

Once satisfied, click "Add To Cart" and then "Go To Cart" in the checkout pop-out.

Unless required, you can remove the free 'website builder' and '.site' - or any other options that appear. Just ensure that your domain name is still there. Click the "Pay Securely" button at the bottom of the page to continue the checkout process.

Continue through Crazy Domains checkout process by clicking the "Continue Order" button/s. In summary, you don't need any of the up-sells or add-ons.

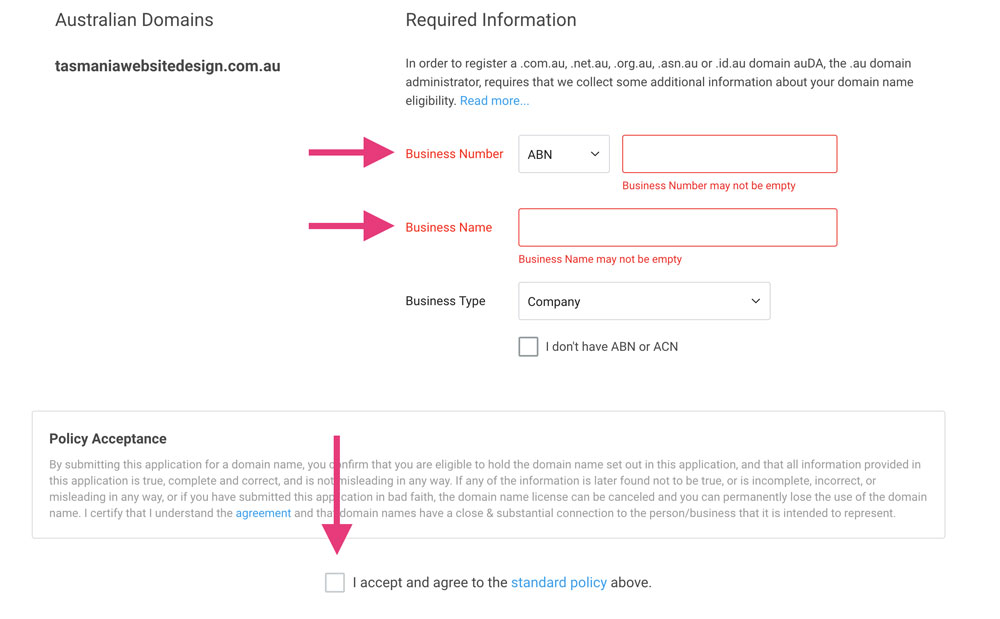
If purchasing a '.com.au' domain name, you'll need to enter a valid ABN and your business/company details. You'll also need to accept the standard policy.
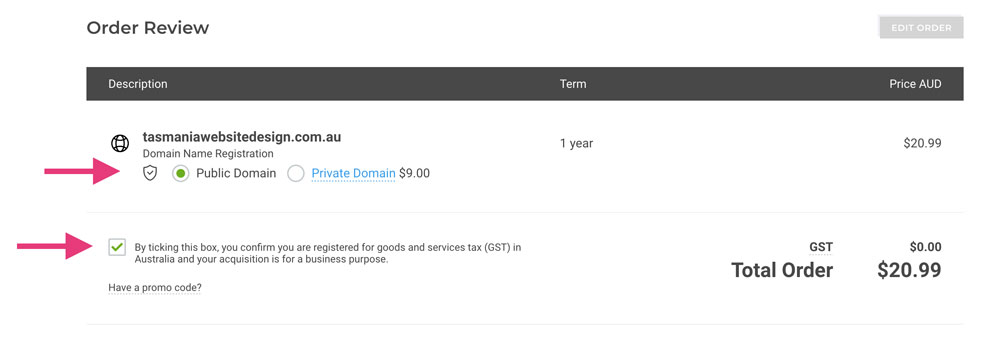
Continue through to the next page, where you confirm if you're GST registered and also configure the privacy option - ie. choose if you want your domain information (name, address etc.) private on the WHOIS database for an additional cost.
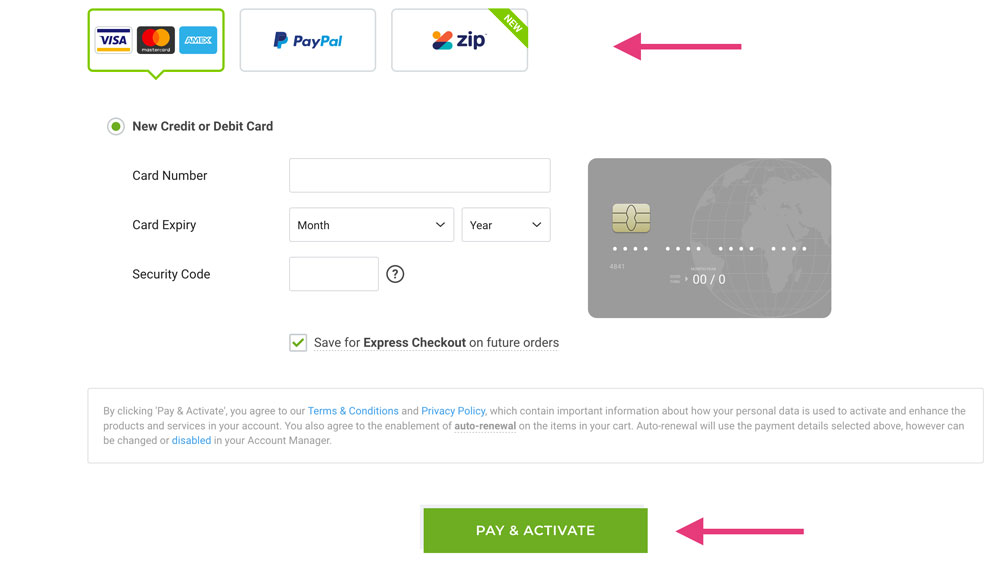
*Finally* - enter your payment information and click "PAY & ACTIVATE" to finish the first part of the process (or continue via PayPal/Zip).
If completed successfully, you'll get an order confirmation page from Crazy Domains. You may also be prompted to create an account along the process which you should also do.
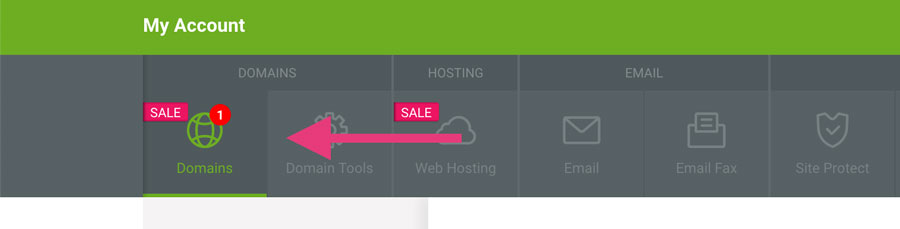
Once you've created an account, you can head to the "DOMAINS" tab in the top menu to check out your new domain.
That's it for the domain name side of things for a moment, time to setup your Google WorkspaceAccount.
To begin, head to Google Workspaces using this link (affiliate link).
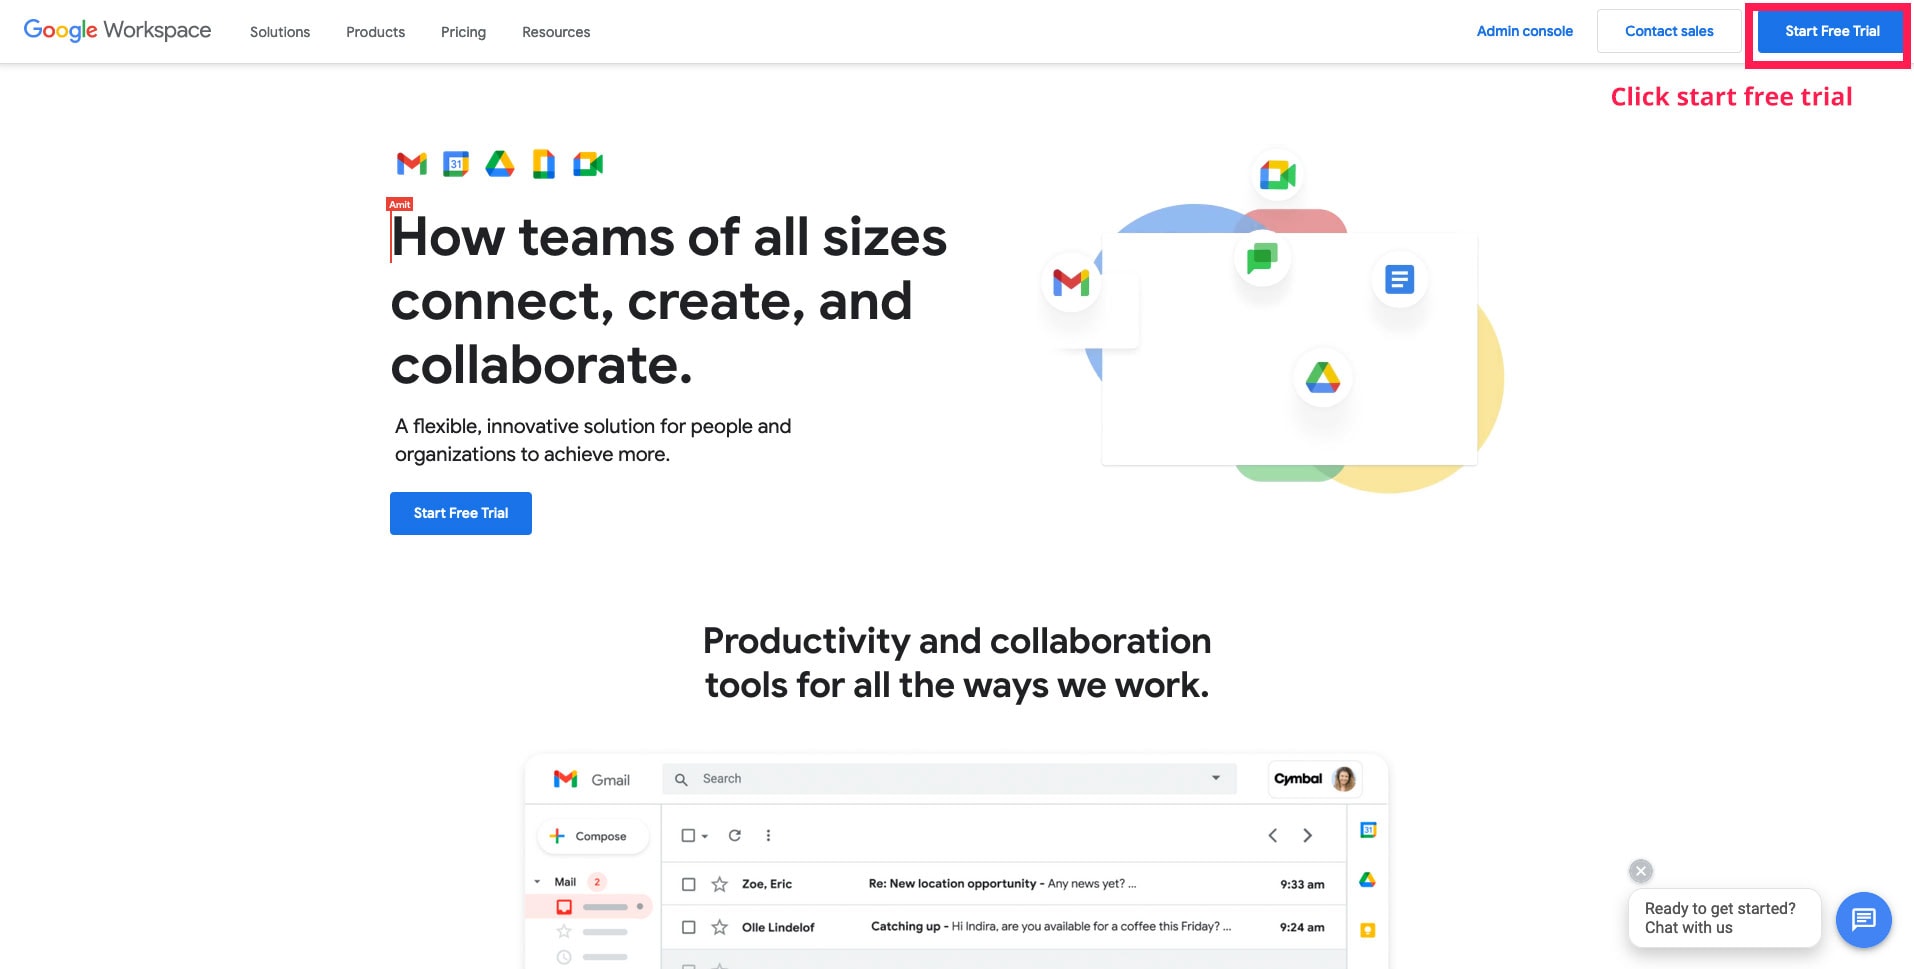
Click the "Start Free Trial" button in the top right hand corner.
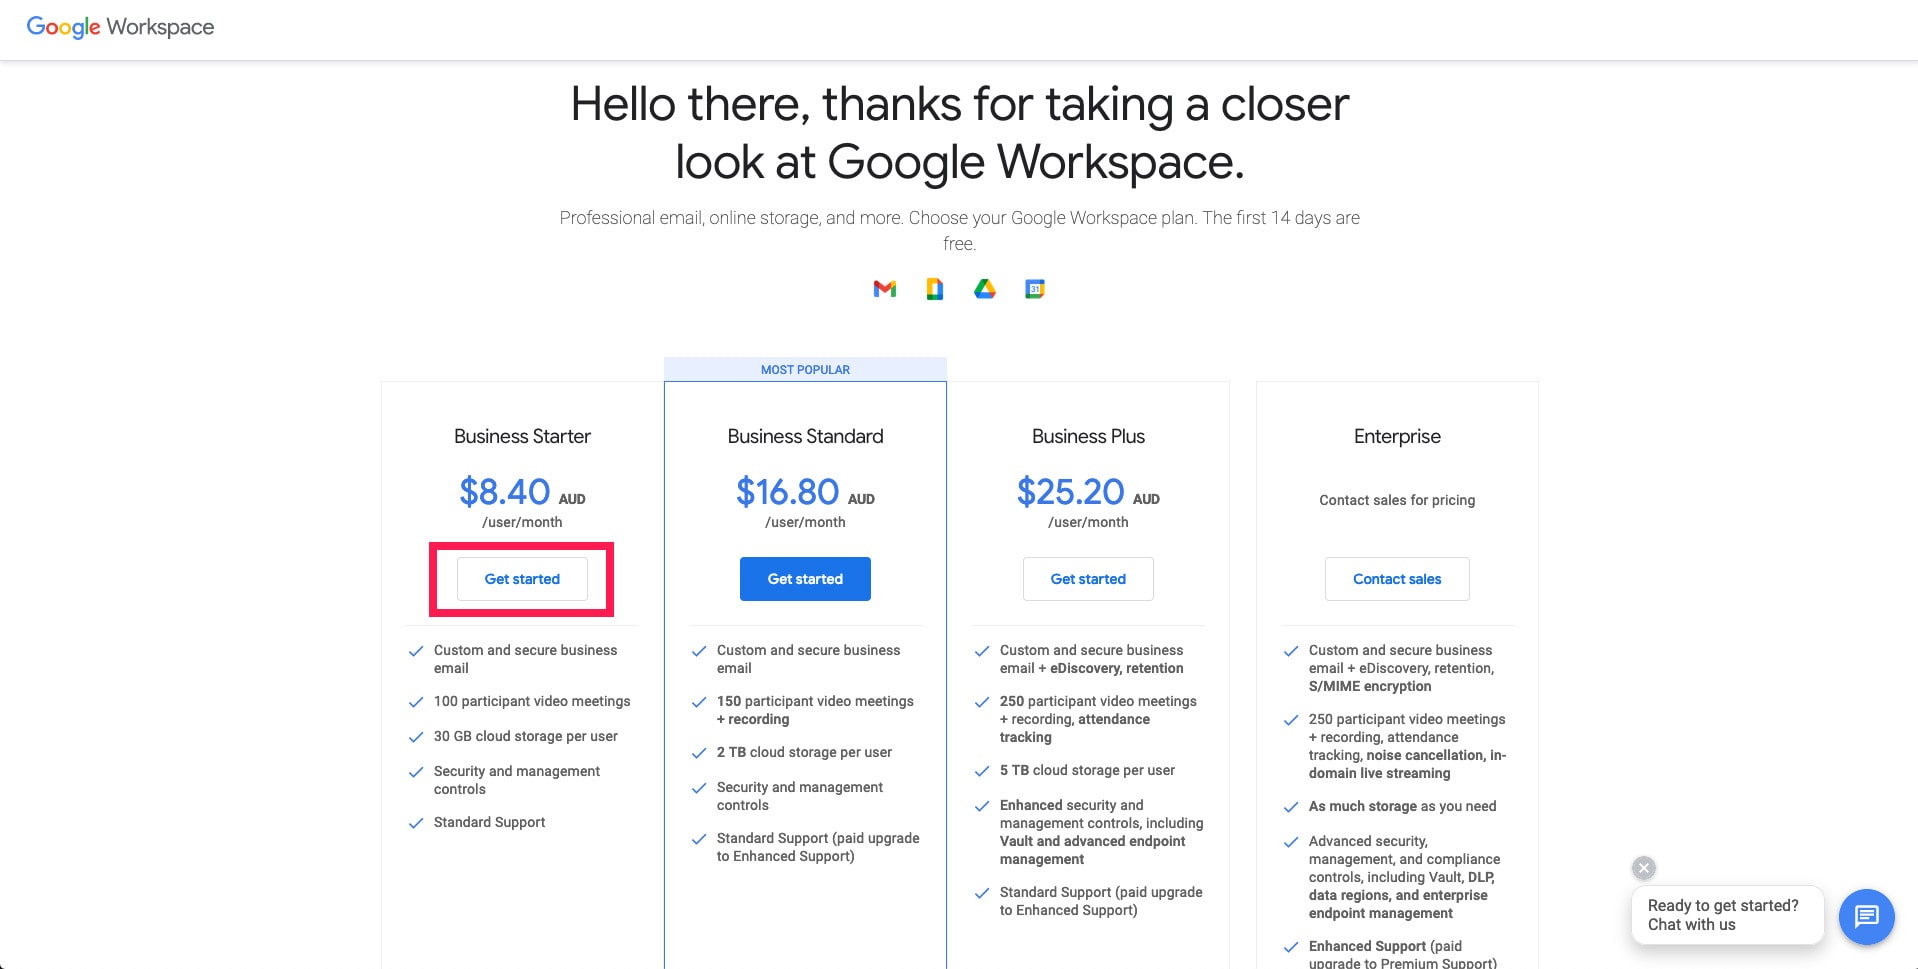
Next, click the "Get Started" button under the "Business Starter" heading (price subject to change). You can also have a look to see if some of the other features of the Business plan may suit your business goals/budget, but we'll stick with Business Starter for now as it has everything we need for a functioning email.
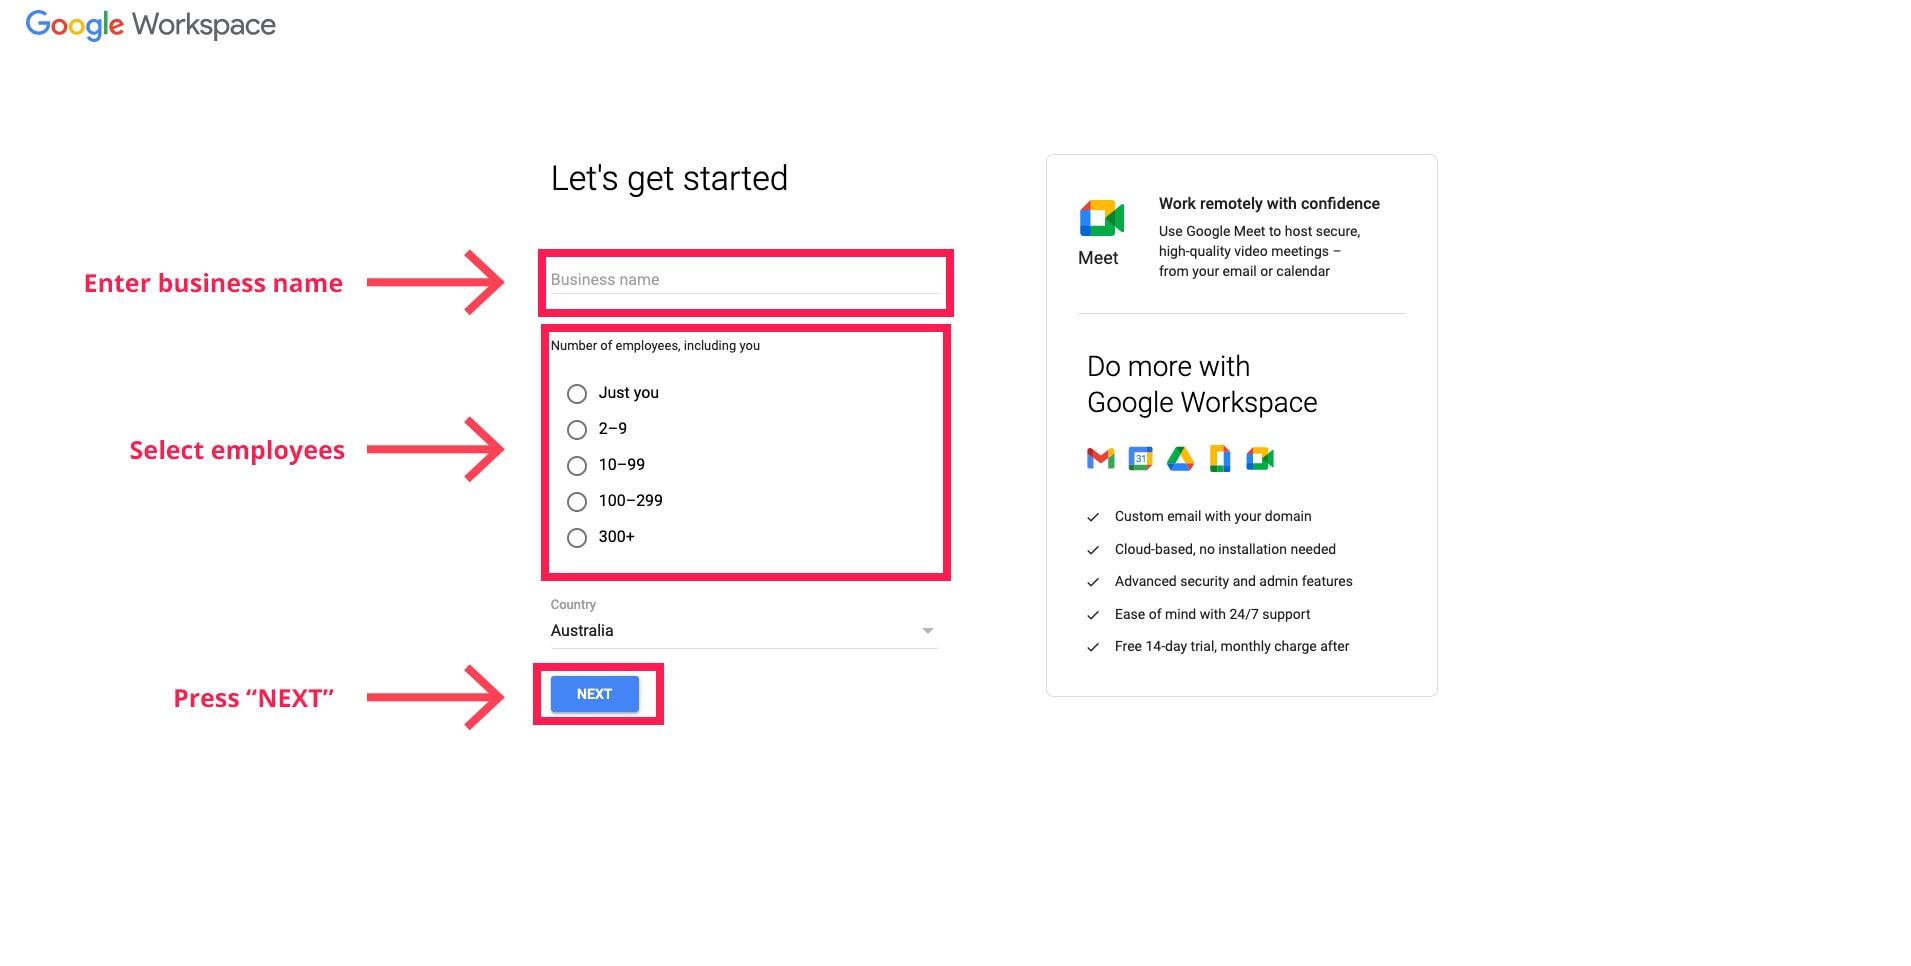
Enter your business name, select employees, choose country and click "Next".
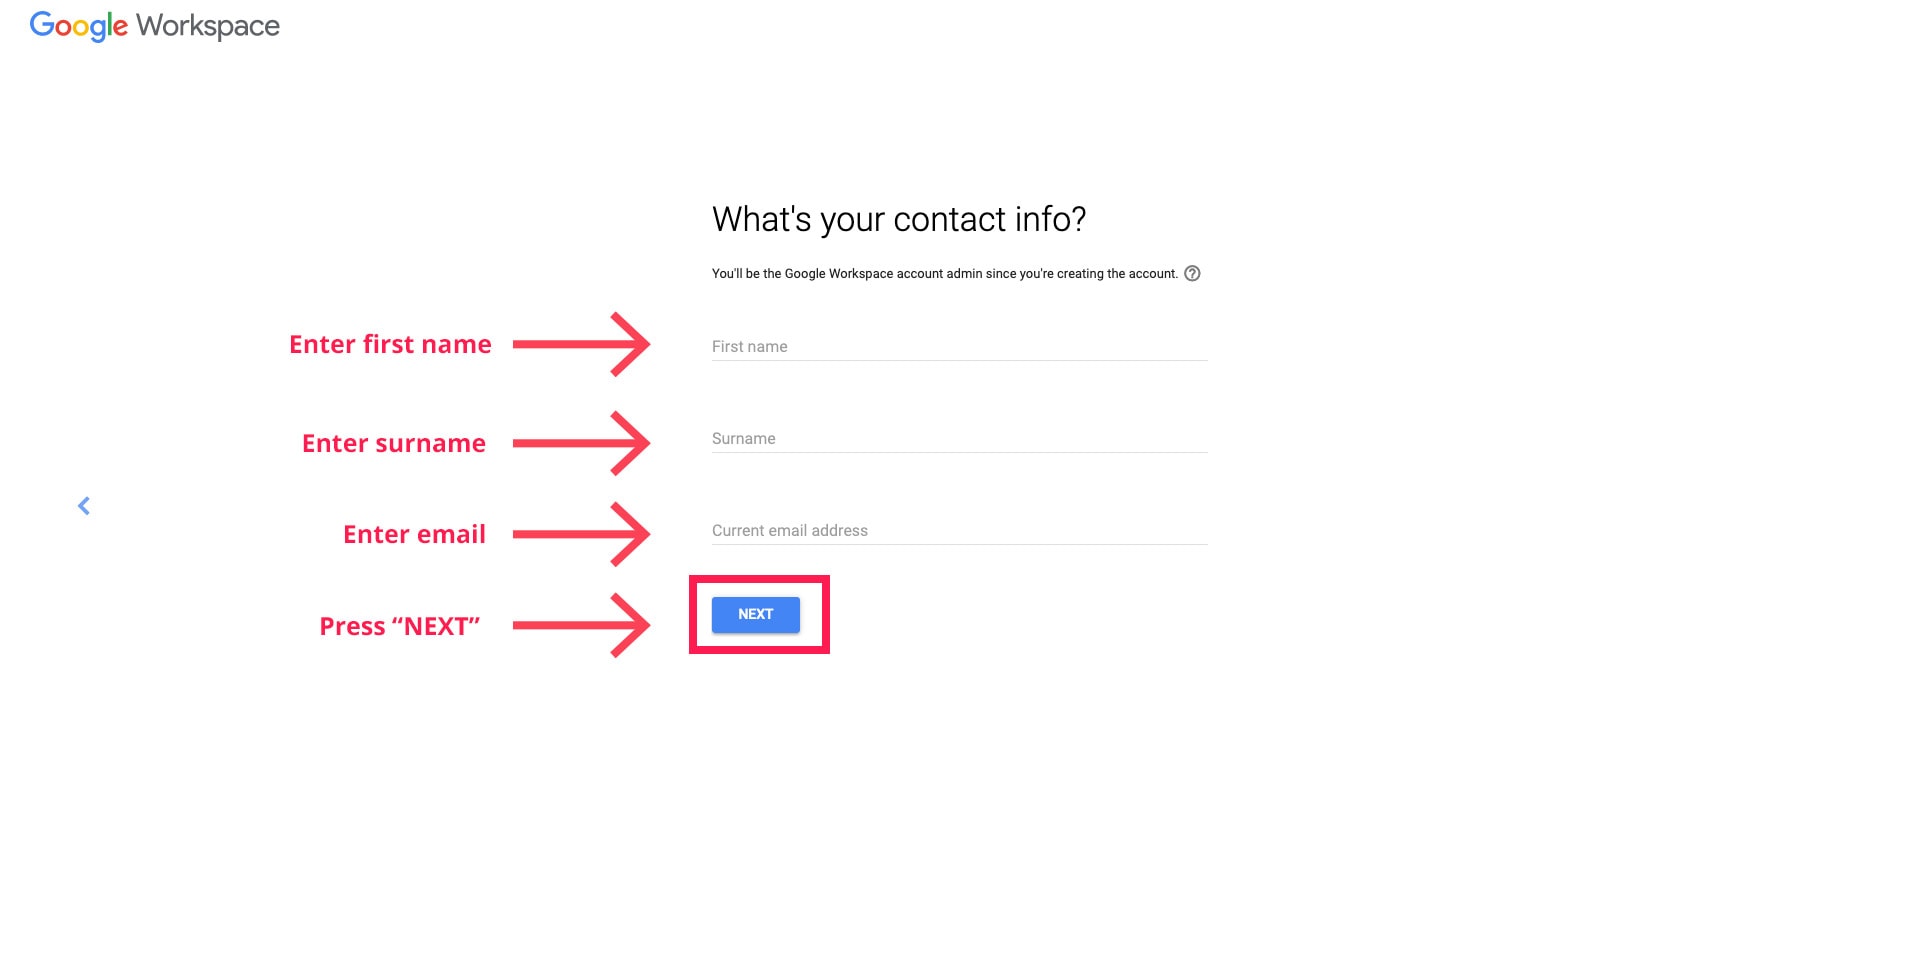
On the next page, enter your name and current email details as requested. Click "Next".
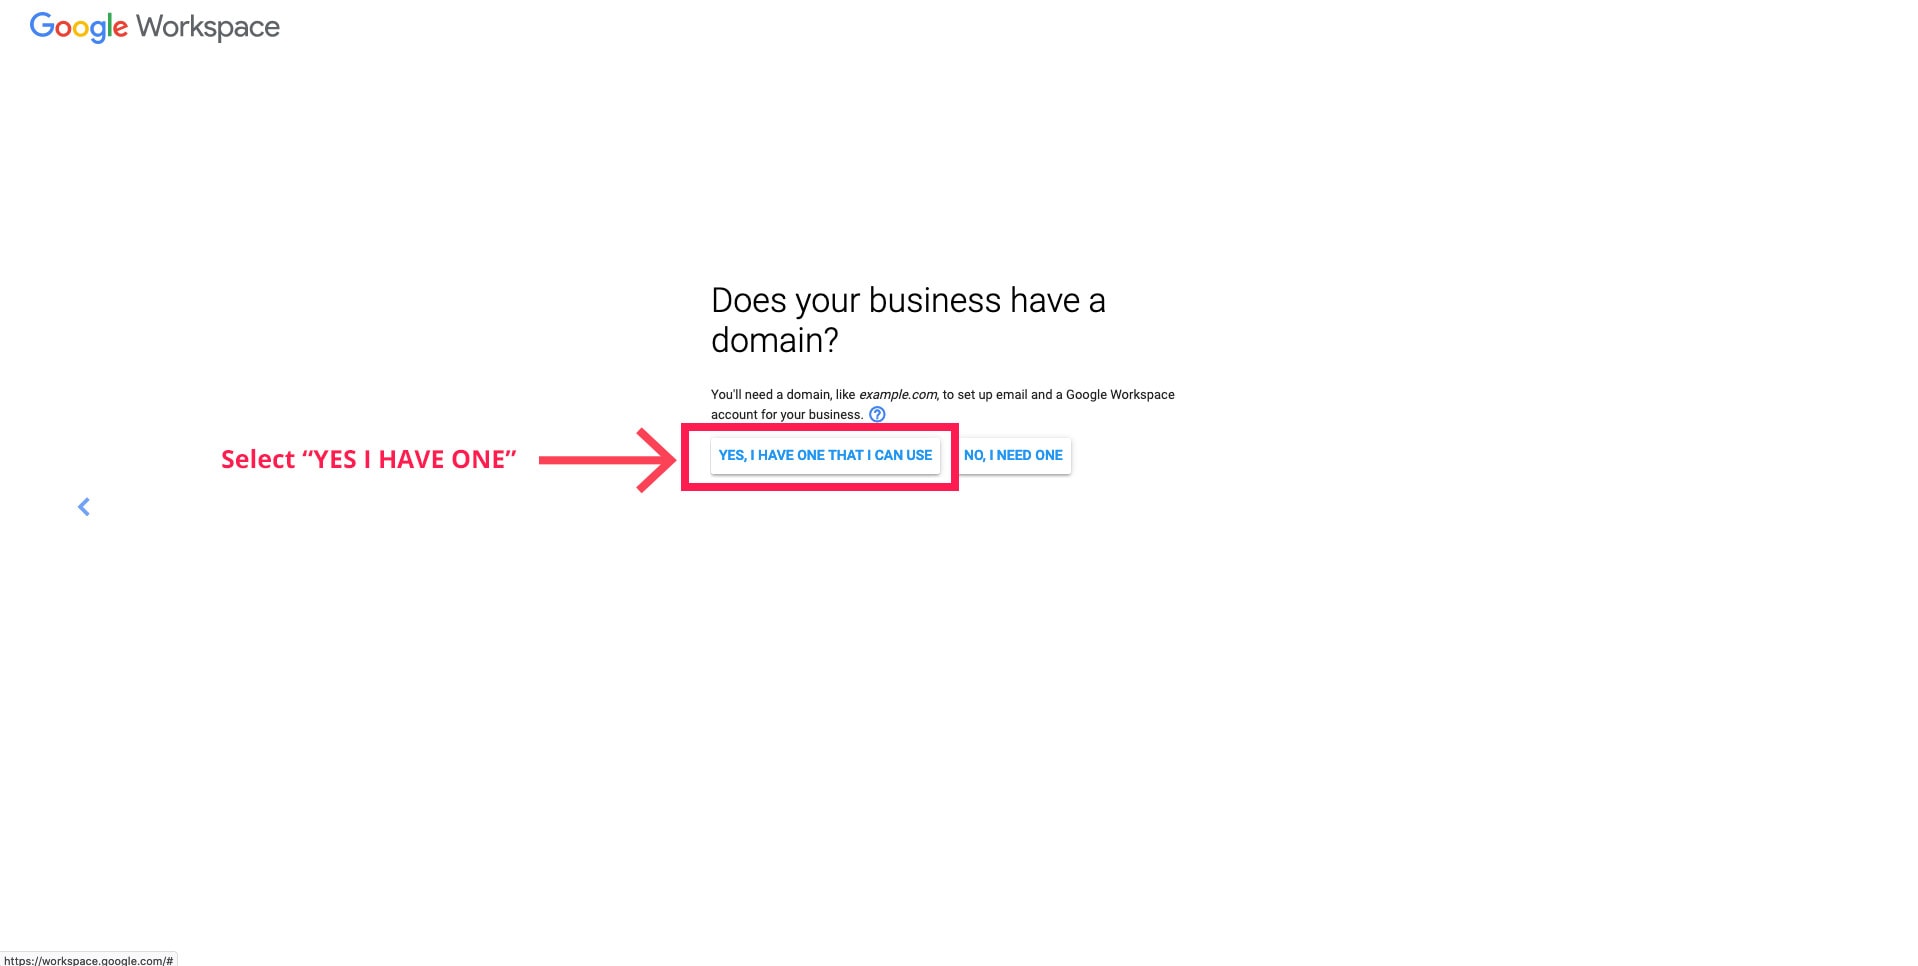
On the next page about a domain, you can select "Yes, I have one that I can use" as we already purchased this previously.
Enter your domain name that you previously purchased on the next page. Click "Next".

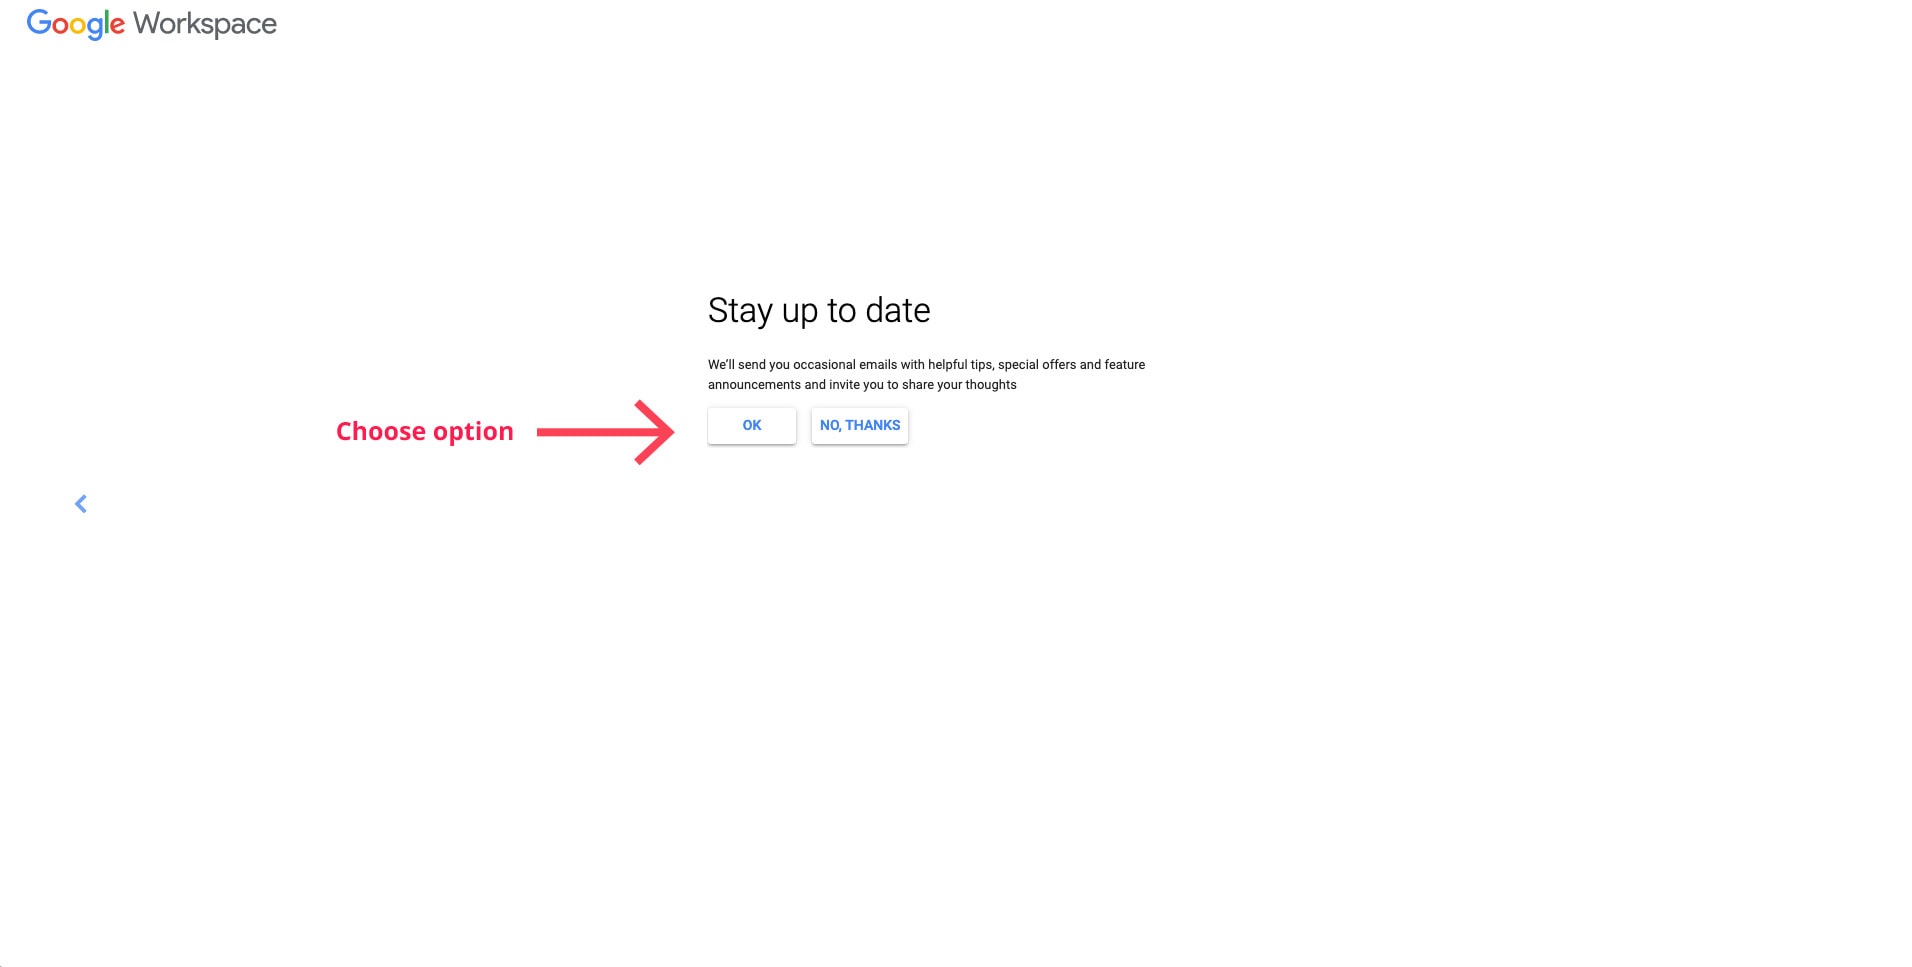
You can click "No, Thanks" on the next two pages to continue through.
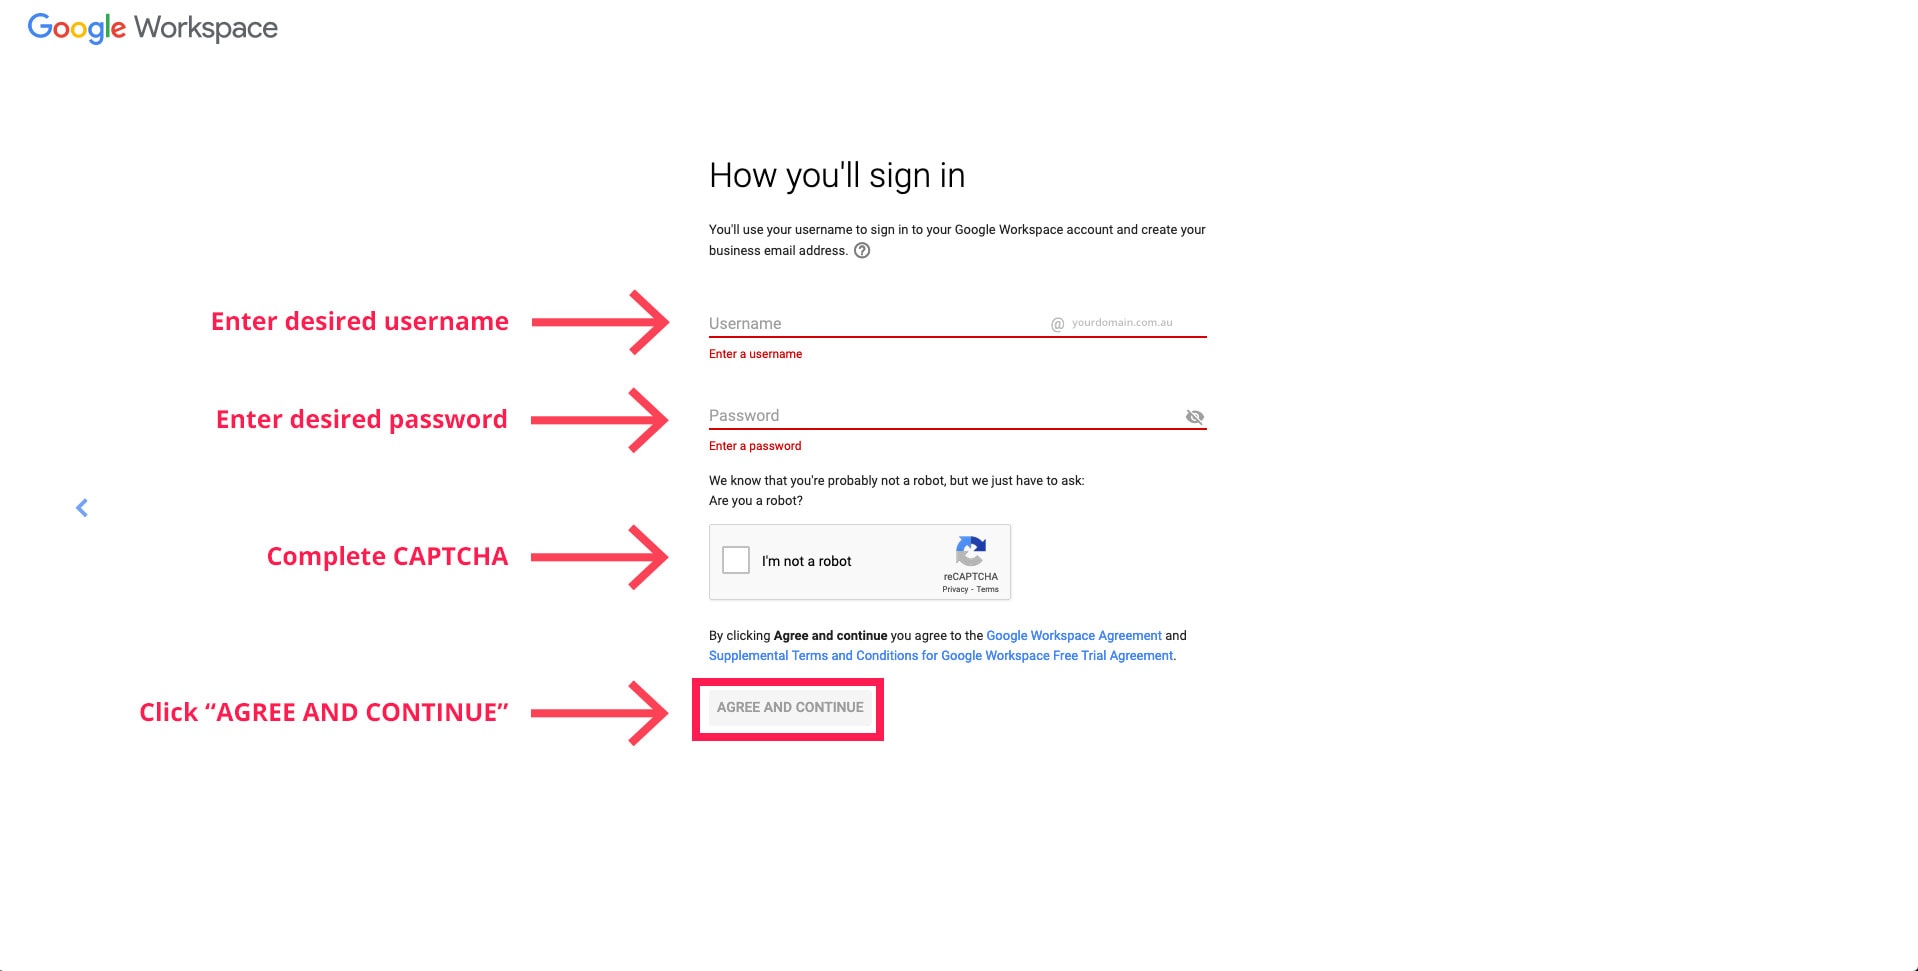
Next up, choosing your email username.
This a good chance to have a think about an email address that is suited to your business type. For example, for work emails we use our names (dominic@domin8designs.com.au) as it's a nice personal touch, however if it's an email address as a general administrator then this may not be appropriate.
Some suggestions include:
Once you've entered an appropriate name, enter a secure password and complete the CAPTCHA. Then click "AGREE AND CONTINUE".
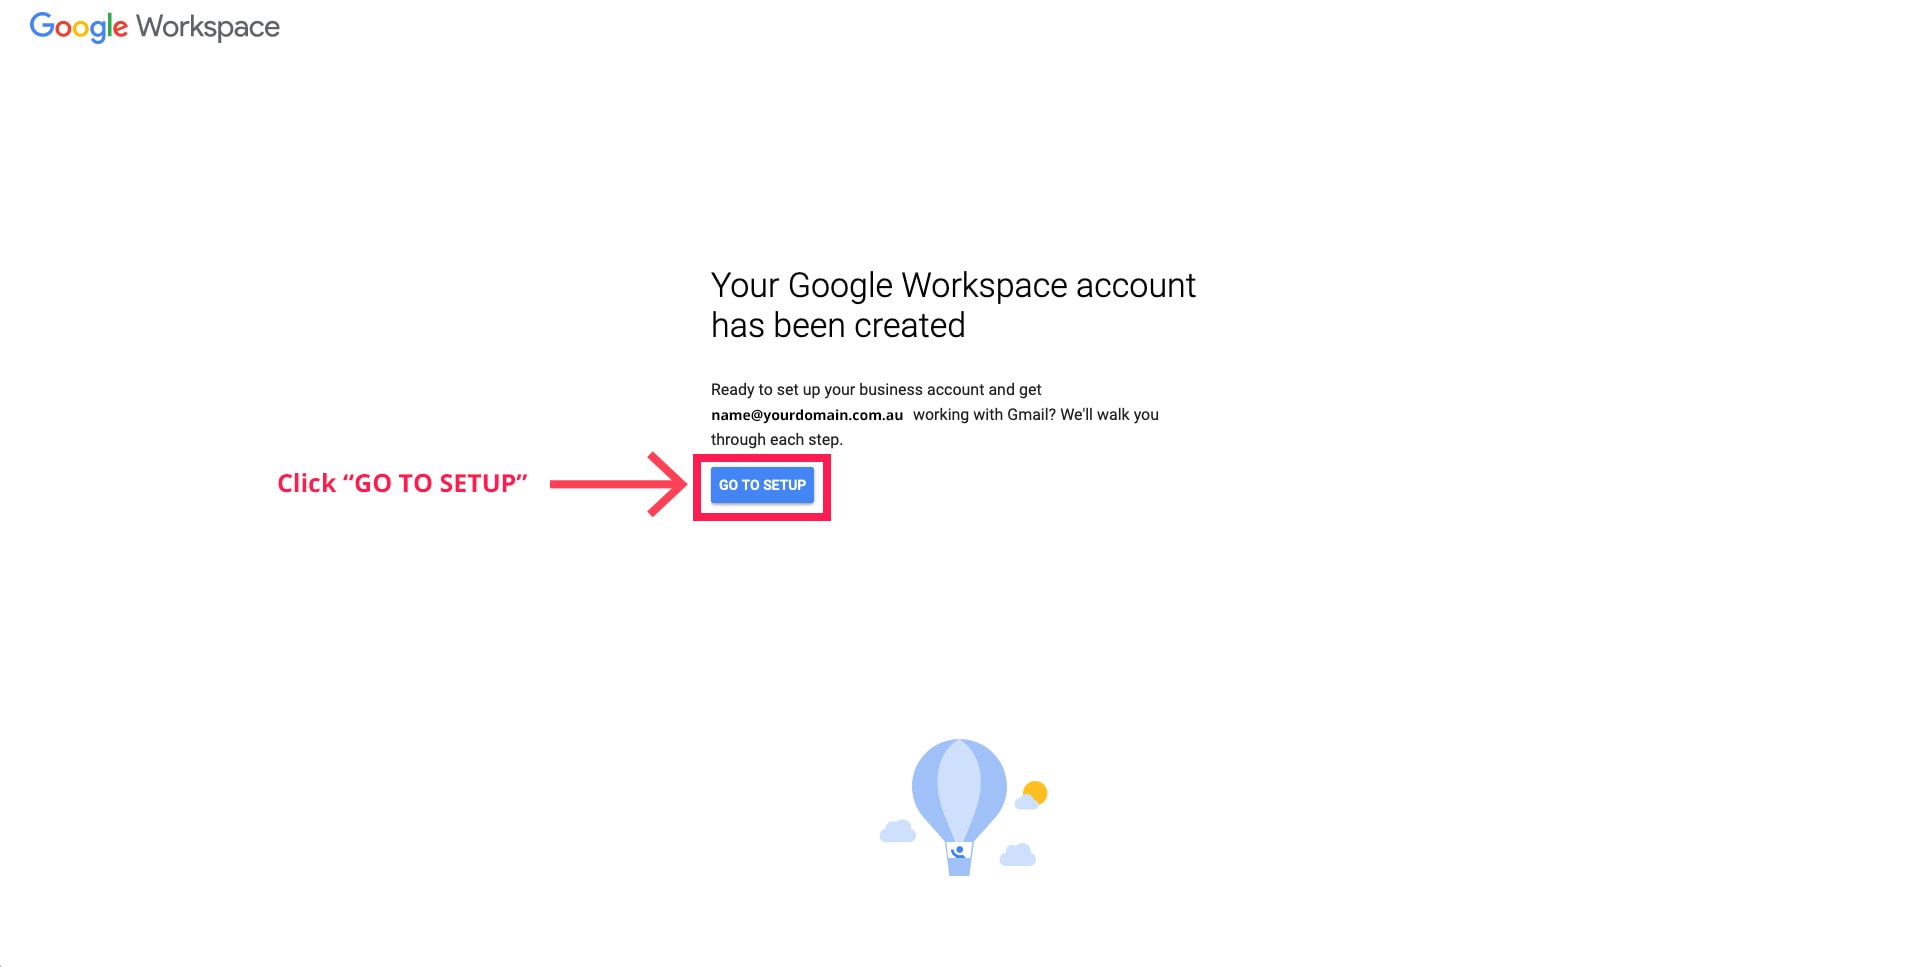
If completed successfully, your Google Workspace account will be created and you can click "GO TO SETUP".
Once complete, you'll be taken to the Admin Console area of Google Workspace. Click "NEXT" in the pop up to continue the process.

First up is verifying the domain name. Click "VERIFY" to continue.

If you're using Crazy Domains as per the tutorial, we are going to switch the verification method to make things a little easier. Click "Or switch verification method."

Select the "Create a CNAME record" option, then "NEXT" to continue.
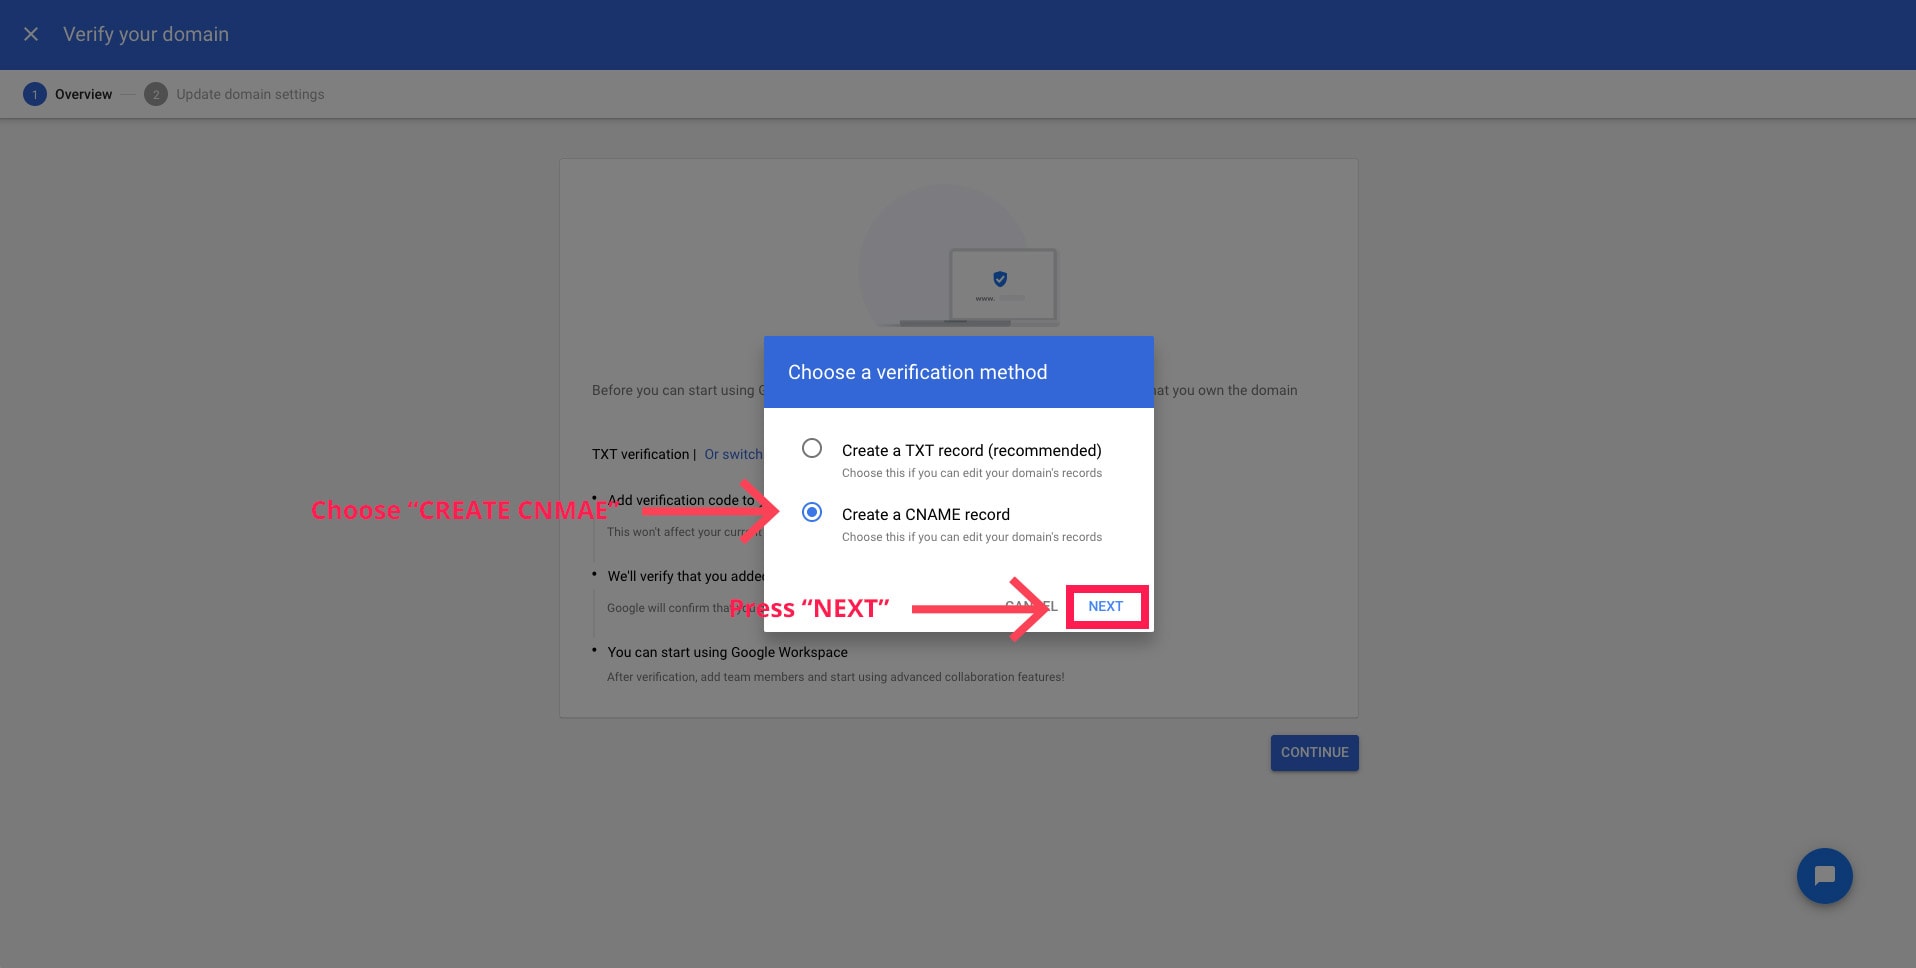
Once the CNAME verification method has been chosen, click "CONTINUE".

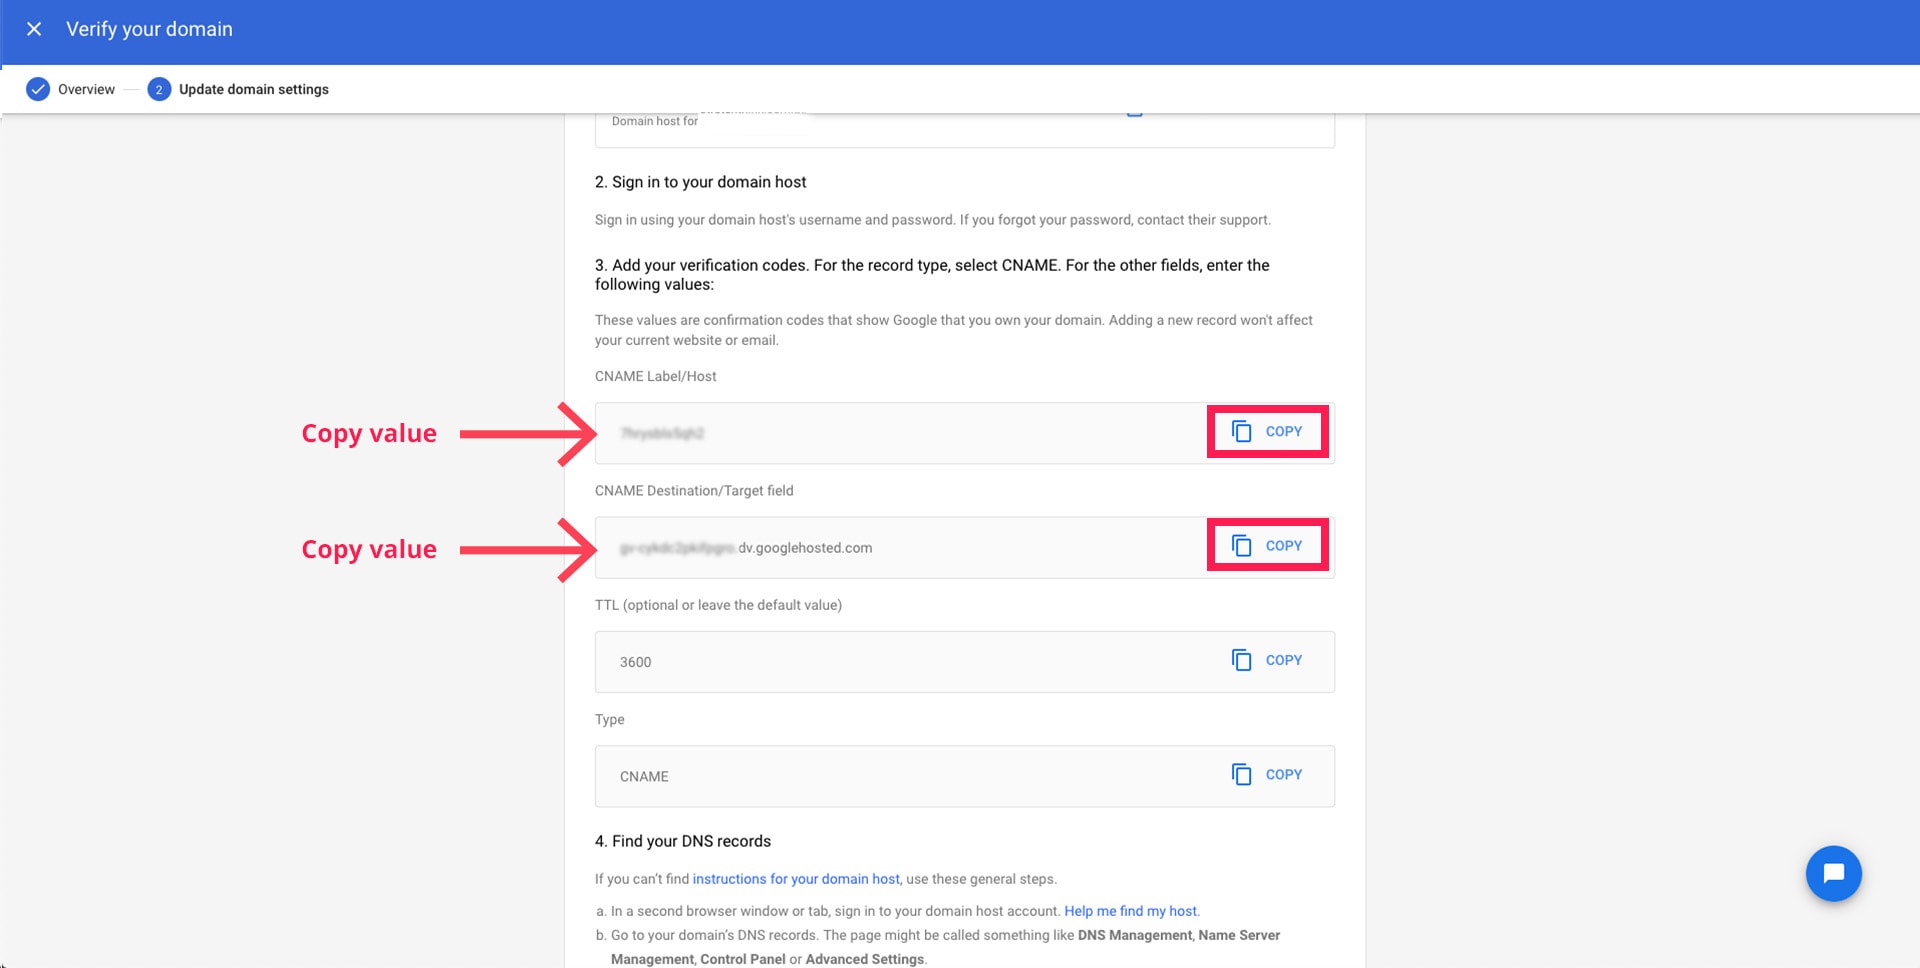
In the next area, you'll see a longer page. What we are going to do here is copy some information from Google Admin Console (where we currently are) into Crazy Domains to verify the domain. Scroll down on the initial landing page to progress.

When you reach the "3. Add your verification codes..." area, we are going to copy the "CNAME Label/Host" and "CNAME Destination/Target field" records - one at a time.
Head back over to Crazy Domains, log in and click on the 'Domains' tab in the main menu (see our earlier step). Then, click on the domain of the name to open up the control panel.

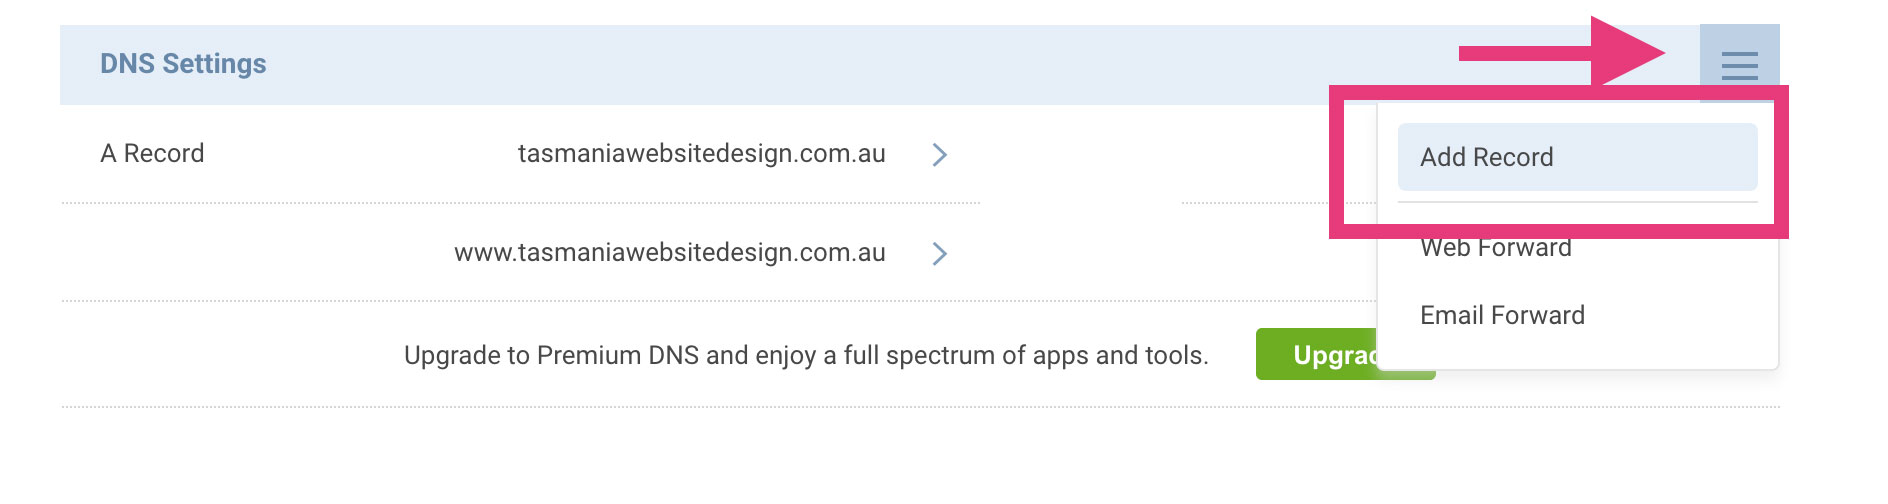
When you have your domain open, scroll down to the DNS Settings area and click the 'hamburger' menu on the right hand side (see the image below). In the dropdown, click "ADD RECORD".
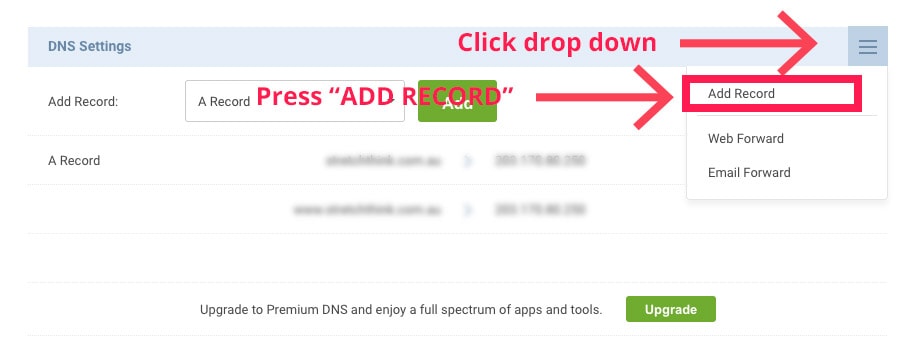
In the newly opened area, select "CNAME Record" from the drop down, then click "Add".

It's in this area we paste the "HOST" and "DESTINATION" values that we previously generated from Google Admin Console. Once entered, select "Update".
Note: sometimes a '.' (full stop) gets copied in the process. If you receive and error when trying to select "Update", check there's no '.' at the end of the host or destination values.

Once successfully added to Crazy Domains, this new record needs to propagate around the world. You may have to wait 15 minutes to 1 hour before you can successfully progress, however you can click the "VERIFY MY DOMAIN" button to check.

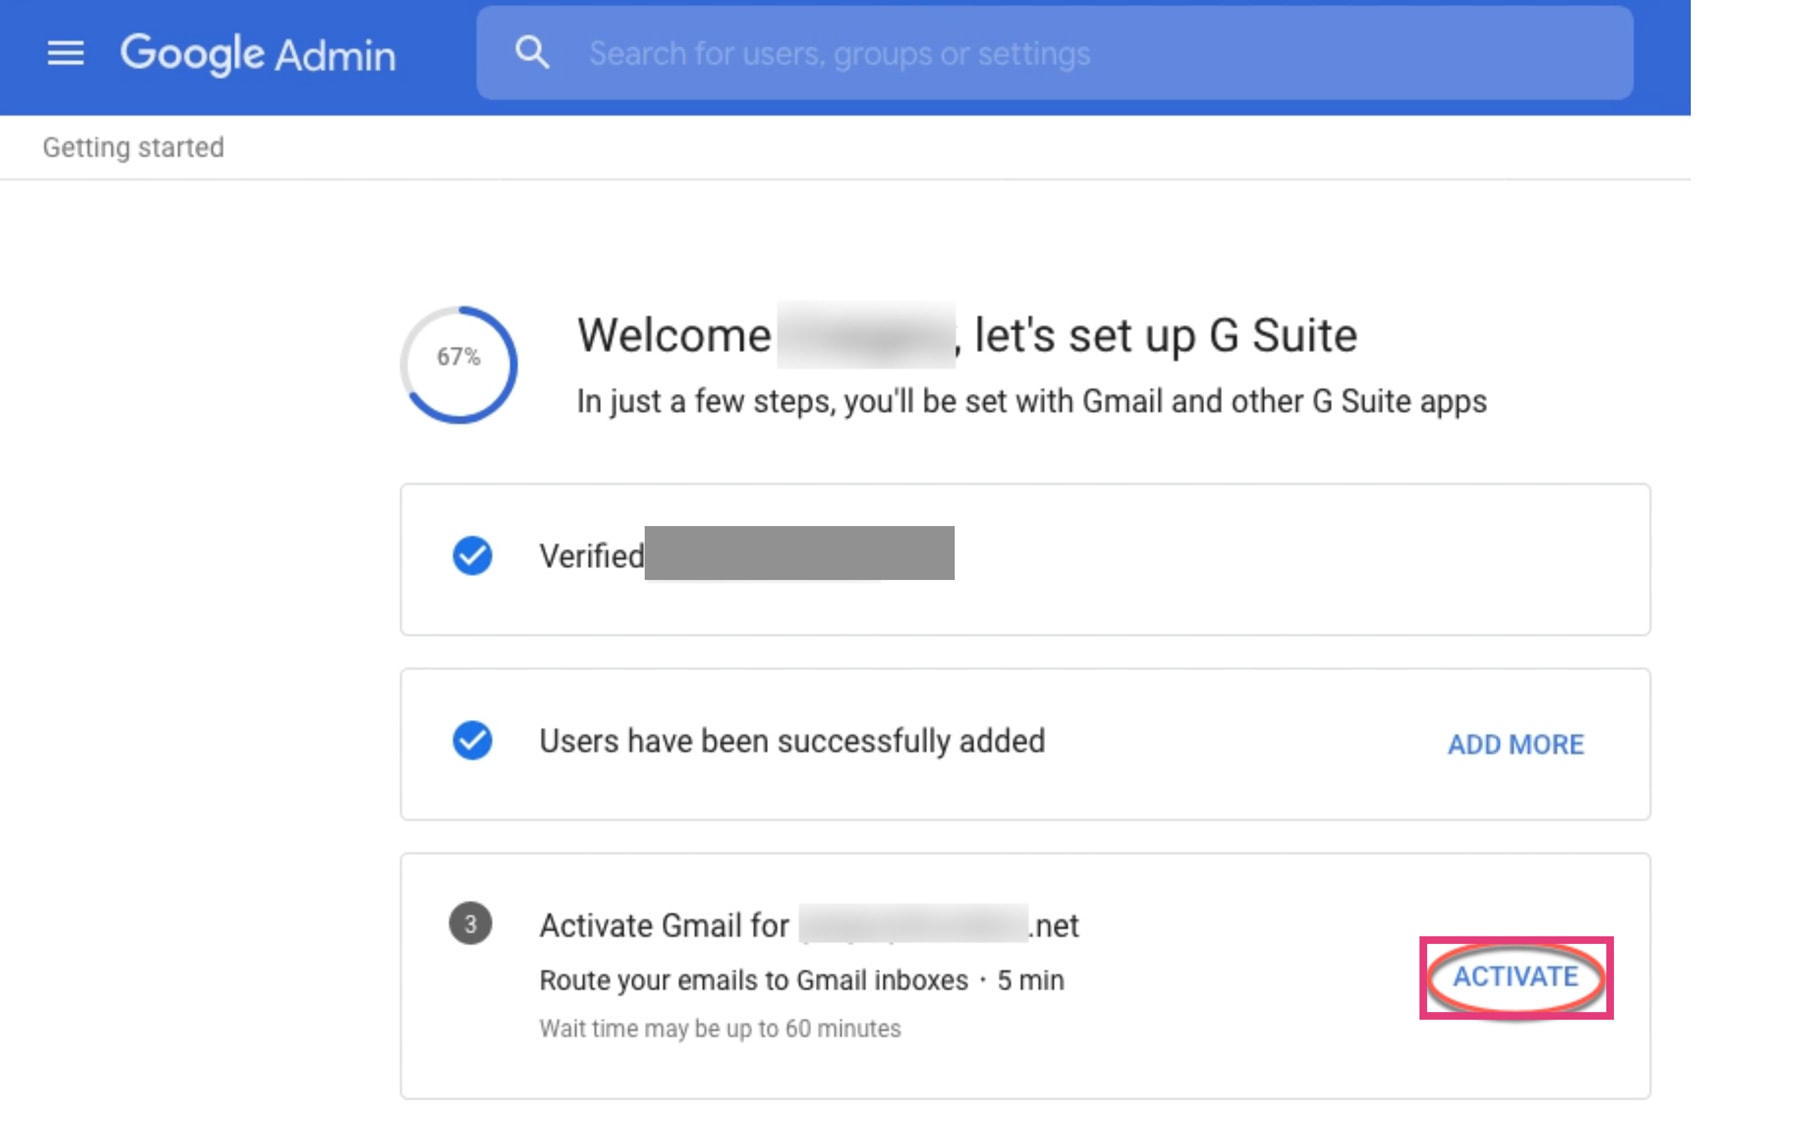
Once verified, you'll be returned to the 'Let's setup...' page - where you can add new users (i.e. additional email accounts) if you wish, or skip overthis.
The final step of the setup process is to add the MX records from Google into Crazy Domains. This is similar to the 'Verify' process from earlier, however we're going to add a different record type. Click "ACTIVATE" to progress under step 3.
Once you progress, you'll see a screen that has a list of records that look like "ALT or "ASPMX". For now, we're going to hear back to Crazy Domains and scroll down to the "DNS Settings" area. Click the hamburger menu bars on the right hand side and click "Add Record."
Select "MX Record" from the drop down and click "Add."

We're now going to copy the values from Google Workspace, into Crazy Domains in the same way as before.
Here's a break down for you:
Helpful tip: If you want, you can memorise these or use the same copy/paste and then click the small "+Add MX Record" to input all the values, then click update to submit these all at once.
Once complete, your Crazy Domains records should like something like the image below.

Once you've added and saved all the records in Crazy Domains, you can head back to Google Admin and click to verify these also. This process may also take a bit of time while the new MX records propagate.
Once completed and verified - that's it, you've successfully verified your domain and added the records correctly.
Google allows you to trial its Google Workspace services for free for 14 days, which is great, however you do have to pay eventually if you want to continue to use your business email and will need to setup billing.
On the admin console page, click "Billing" or click the "SET UP BILLING" banner if it's active.
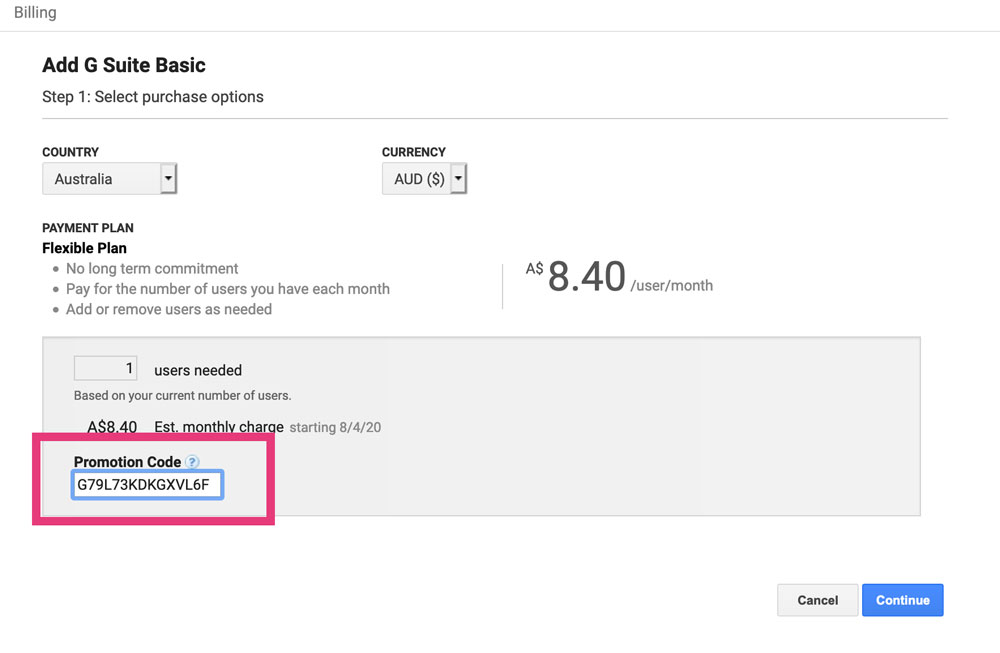
Double check on the next page that the information is correct and the Google Workspace Basic plan is selected.
Google Workspace Business Starter (Asia Pacific) 2023: MCTFQ4EY43PV9RU
Google Workspace Business Standard (Asia Pacific) 2023: 33DY7JU9MUN7973
You can input this under the 'Promotional Code' area.
We won't detail the next few steps as hopefully they're relatively straightforward, however use the "Continue" button and input the respective information and payment details over the next few pages.
Once complete, you will have successfully setup a business email address using Gmail.
Now that your email has been setup, you can head over to your email client like Outlook or Airmail and setup your account there. Many modern email clients now have the option to easily add a Gmail account, and because technically your new account is a Gmail one, you can use this option to easily set it up.
Just ensure that you use your new email address that uses your domain name, not the @gmail.com one if you had this previously.
Alternatively, you can access your email via the Gmail website and use this as the client. As above, a benefit we've found of using Gmail is that if we're travelling abroad, you can easily access your emails by visiting Gmail (as opposed to having to remember how and where to log in if using a domain provider's inbuilt email system or pesky webmail client).
We really hope that this post was useful for businesses or organisations looking to improve their professionalism by creating a business email using their domain name.
If we've missed a step or something is not quite right, please let us know so we can update this post.
All the same, if you've found this post useful, we always appreciate sharing it via your social media channels.
Finally, if like many business in Tasmania, you feel a little overwhelmed with your current workload and just want someone to set up your emails (or website) for you, then get in touch via our "Discuss A Project" page and we'll happily help out.
Cheers, Dom.
Psst. You may have noticed a few affiliate links in this article, these help offset some of the time and costs associated with producing content like this. You can learn more via our Affiliate Disclosure page.

Stay ahead in Hobart's digital marketing landscape with our latest insights about Google's 2024 core update, with tailored information for Tasmania's small businesses sector.
Read this post →Learn why a one-page website might not be your best option for a small business website - as we consider SEO, user experience and more to help you make an informed decision.
Read this post →Unlock the potential of your small business with our guide to the top 5 essential website features for 2024, from fast loading speeds to voice search optimisation, learn how to stay ahead in the digital landscape.
Read this post →